Welcome to the DFO World Wiki. With many major updates since the release of DFO, many items are missing. Visit Item Database Project to learn more.
Please remember to click "show preview" before saving the page.
Thanks for the updated logo snafuPop!
Difference between revisions of "Female Fighter"
(→Skills) |
(→Skills) |
||
| Line 51: | Line 51: | ||
| [[Image:CSuplex.gif]] || [[Cancel Suplex]] | | [[Image:CSuplex.gif]] || [[Cancel Suplex]] | ||
|- style="background-color: #ffffff;" align="center" | |- style="background-color: #ffffff;" align="center" | ||
| − | | [[Image:Diamond.gif]] || [[ | + | | [[Image:Diamond.gif]] || [[Iron Physique]] |
|- style="background-color: #ffffff;" align="center" | |- style="background-color: #ffffff;" align="center" | ||
| − | | [[Image:DiamondSmash.gif]] || [[ | + | | [[Image:DiamondSmash.gif]] || [[Seismic Punch]] |
|} | |} | ||
| valign="top"| | | valign="top"| | ||
| Line 63: | Line 63: | ||
! style="width:100pt;" | Name | ! style="width:100pt;" | Name | ||
|- style="background-color: #ffffff;" align="center" | |- style="background-color: #ffffff;" align="center" | ||
| − | | [[File:Illusion.png]] || [[ | + | | [[File:Illusion.png]] || [[Doppelganger]] |
|- style="background-color: #ffffff;" align="center" | |- style="background-color: #ffffff;" align="center" | ||
| − | | [[File:NenBlast.png]] || [[Nen | + | | [[File:NenBlast.png]] || [[Nen Shot]] |
|} | |} | ||
| valign="top"| | | valign="top"| | ||
| Line 75: | Line 75: | ||
! style="width:100pt;" | Name | ! style="width:100pt;" | Name | ||
|- style="background-color: #ffffff;" align="center" | |- style="background-color: #ffffff;" align="center" | ||
| − | | [[Image:ThrowSand.gif]] || [[ | + | | [[Image:ThrowSand.gif]] || [[Sand Splash]] |
|- style="background-color: #ffffff;" align="center" | |- style="background-color: #ffffff;" align="center" | ||
| − | | [[Image:Crouching.gif]] || [[ | + | | [[Image:Crouching.gif]] || [[Crouch]] |
|} | |} | ||
| valign="top"| | | valign="top"| | ||
| Line 87: | Line 87: | ||
! style="width:100pt;" | Name | ! style="width:100pt;" | Name | ||
|- style="background-color: #ffffff;" align="center" | |- style="background-color: #ffffff;" align="center" | ||
| − | | [[Image:UpperMuse.gif]] || [[ | + | | [[Image:UpperMuse.gif]] || [[Muse's Uppercut]] |
|- style="background-color: #ffffff;" align="center" | |- style="background-color: #ffffff;" align="center" | ||
| − | | [[Image:CUpperMuse.gif]] || [[Cancel | + | | [[Image:CUpperMuse.gif]] || [[Cancel Muse's Uppercut]] |
|- style="background-color: #ffffff;" align="center" | |- style="background-color: #ffffff;" align="center" | ||
| [[Image:HammerKick.gif]] || [[Hammer Kick]] | | [[Image:HammerKick.gif]] || [[Hammer Kick]] | ||
| Line 97: | Line 97: | ||
| [[Image:LowKick.gif]] || [[Low Kick]] | | [[Image:LowKick.gif]] || [[Low Kick]] | ||
|- style="background-color: #ffffff;" align="center" | |- style="background-color: #ffffff;" align="center" | ||
| − | | [[Image:TigerStrike.gif]] || [[Tiger Strike]] | + | | [[Image:TigerStrike.gif]] || [[Tiger Chain Strike]] |
|- style="background-color: #ffffff;" align="center" | |- style="background-color: #ffffff;" align="center" | ||
| − | | [[Image:CondorDive.gif]] || [[ | + | | [[Image:CondorDive.gif]] || [[Air Walk]] |
|- style="background-color: #ffffff;" align="center" | |- style="background-color: #ffffff;" align="center" | ||
| [[Image:HurricaneKick.gif]] || [[Hurricane Kick]] | | [[Image:HurricaneKick.gif]] || [[Hurricane Kick]] | ||
Revision as of 08:48, 5 August 2009
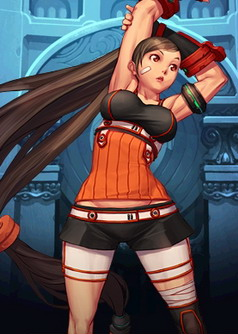
The Fighter likes to charge right into close-range combat, fists flailing, fury fired up. What she lacks in magical might she more than makes up for in physical strength and agility. She usually sports gauntlets, knuckles, claws or even boxing gloves. And as she gains experience knocking out monsters, the more expansive her repertoire of fighting moves becomes: the Suplex, the Back Breaker, even the swift Low Kick, which allows her to deliver quick, powerful jabs to her enemies' legs, disrupting their movement.
Contents
Second Class Advancement
Becoming the Berserker
The Slayer must first reach level 18.
- Talk to Sharon.
- Then, collect 60 red cubes and get two drops from the Ice Zombie on Master's Road.
- Talk to G.S.D. to become the Berserker.
Becoming the Blade Master
The Slayer must first reach level 18.
- Talk to Roton, the Cube Grinder.
- Then, collect 60 white cubes.
- Talk to G.S.D.
- Clear the Ice Zombie stage on Expert's Road difficulty.
- Return to G.S.D. to become the Blade Master.
Becoming the Soul Bender
The Slayer must first reach level 18.
- Talk to Sharon.
- Then, collect 10 Stones of the Dead, 8 Stones of Grudge, and 2 Stones of Revenge. These drops can be found from the blue zombies, the red zombies, and the zombie boss on the Ice Zombie stage.
- Talk to G.S.D. to become the Soul Bender.
Becoming the Asura
The Slayer must first reach level 18.
- Talk to Roton, the Cube Grinder.
- Then, collect 60 blue cubes and get two drops from the Ice Zombie on Expert's Road. This must be done alone.
- Talk to G.S.D. to become the Asura.
